Redundant OpenBSD Firewalls
Part 1 - Introduction
I currently have a home firewall running OpenBSD. The hardware is a PC Engines apu2c2, a fanless, solid state embedded system with an AMD 1GHz quad-core 64 bit processor, 2GB of DRAM, and a 32GB mSATA SSD. Which is overkill for the job it needs to do. It also has 3 gigabit network ports. Which is perfect for the job it needs to do.
I used to have this firewall deployed between my ARRIS SURFboard SB6141 cable modem and the rest of my home network.
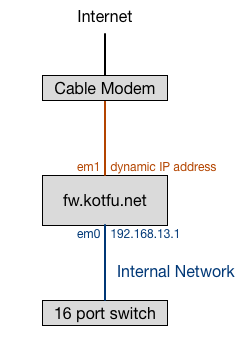
Like many ISP’s, mine gives my firewall an IP address via DHCP; I don’t have a static public IP address. In additional to NAT and packet filtering, this firewall provides the following additional services to my home network:
- NTP Server
- DHCP Server
- Caching DNS Resolver
- Authoritative Name Server (for internal network hosts only)
I have an unused PC Engines alix2d3, which used to be the firewall until my home internet connection got faster than 100 Mbps. This unused hardware will be perfect to provide fail-over/redundant backup for the firewall and the other services it provides.
My objectives for this project, in priority order are:
- learn some new stuff
- provide redundancy for the hardware and services
I don’t care at all about optimizing for performance. I have a small home network. I don’t need to double the throughput of my firewall, or double the throughput of my name server. I want my network to stay up if I have a hardware failure or if I do an operating system upgrade.
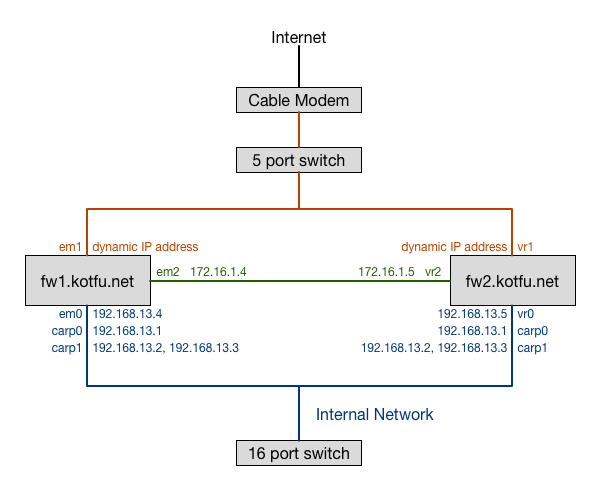
In this guide, I will describe how to configure a single firewall instance to run NAT, packet filter, DHCP, NTP, and DNS services, and then describe a stepwise transformation from the non-redundant setup to a fully redundant setup. When we are done, it will look something like this:
You are reading the introduction to this guide right now. You can keep reading for more info about the prerequisite skills, hardware, and software you will need, or you can jump right in.
- Part 1 - Introduction
- Part 2 - Routing and Packet Filter
- Part 3 - Network Services
- Part 4 - Redundant Routing and Packet Filter
- Part 5 - Redundant Network Services
- Part 6 - Conclusion
Changelog
29 Dec 2021
- Updates for OpenBSD 7.0, including improved explanation for why we can’t use DHCP on a CARP interface
- switch from
dhclient, which is old and on it’s way out, todhcpleased, which is the future
5 May 2021
- Validate everything works with OpenBSD 6.9
8 Aug 2020
- Switch from isc_dhcpd in packages to the stock dhcpd. Thanks to Guy Godfroy for pointing out the stock dhcpd server can synchronize leases.
1 Jun 2020
- Validate everything works with OpenBSD 6.7
- Minor correction to Redundant Routing and Packet Filter
section: as of 6.7
dhclientworks on CARP interfaces.
9 Nov 2019
- Validate everything works with OpenBSD 6.6
1 Jun 2019
- Use
rcctlto start/restart services - Validate everything works with OpenBSD 6.5.
21 Nov 2018
- Validate everything works with OpenBSD 6.4, OpenBSD 6.3, and OpenBSD 6.2
Skills
These articles will not explain every configuration procedure in detail. If you understand and can perform the following procedures on OpenBSD, you will be just fine:
- edit and save a file using an editor like
vi - restart system services
- perform actions as the super user using
doasorsu - configure ssh so you can log in using public keys instead of passwords
- understand simple shell scripting
I also won’t be focusing on all the configuration details of services (DHCP, NTP, DNS). For example, when we configure an authoritative name server I won’t discuss how to configure zone files.
I will briefly describe how to set up each of these services, with a basic configuration file. I’ll also describe in detail how to make each of these services work in a redundant configuration.
Hardware
If you want to replicate these configurations for fun or learning purposes, I suggest doing it all in virtual machines using something like the freely available VirtualBox, or the commercial VMware Workstation for Windows. In the virtual environment, once you have the software, you won’t need any additional hardware.
If you are going to do it for real, I assume you already have a network switch for your internal network. You will need to have the following additional hardware:
- Two pieces of hardware capable of running OpenBSD, which runs on just about anything. You can use a spare computer, or buy a nifty fanless kit, but each machine needs to have 3 network interfaces.
- If you are using 10MBit or 100MBit network interface, you’ll need a cross-over ethernet cable. If you are using Gigabit network interfaces, a standard patch cable will work fine.
- An additional switch or hub with at least 3 ports on it (different than the switch you use for your internal network).
Operating System
This guide was originally written using OpenBSD 6.1. It has been updated for each version of OpenBSD through version 6.9, and includes changes that won’t work in prior versions. I strongly encourage you to use the current version of OpenBSD.
You will need to have the operating system installed on either two virtual machines, or your two pieces of hardware.
Conventions
When you see one or more shell commands prefaced by a hash prompt, these
commands must be executed as the super user. You can either log in as the
super user, or use doas or su so that the commands are run as
root. Here’s an example:
fw1# sysctl net.inet.carp.allow=1
fw1# echo 'net.inet.carp.allow=1' >> /etc/sysctl.conf
Similarly, if the commands can or should be run as a user other than the super user, they will be indicated with a dollar sign prompt:
fw2$ cat /etc/resolv.conf
I also indicate the hostname as part of the shell prompt, so you can be sure where you should be executing these commands.
Network Planning
A bit of planning ahead can save us some reconfiguration tasks along the way. One of the core capabilities we will be using during this project is CARP, which allows multiple hosts on the same network segment to share an IP address. The gateway IP address for all of our internal network hosts will be set to one of these CARPed (I justed adjectived a noun) addresses.
Therefore, when we assign IP addresses, we need each of our firewalls to have an IP address that isn’t the gateway IP address. We will use 192.168.13.1 as our gateway IP address. We are also going to use 192.168.13.2 and 192.168.13.3 as CARPed addresses (I’ll explain why later).
Let’s creatively name our two firewalls fw1 and fw2, and assign them IP addresses of 192.168.13.4 and 192.168.13.5 respectively.
On with the show
I’ve divided this material into 5 parts. At the end of each part I’ll describe how you can verify the configuration changes from that part are functional.